The ribbon sample code
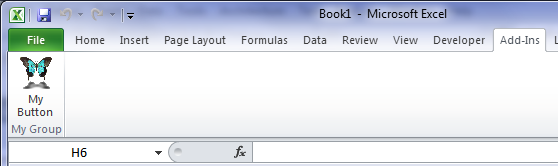
The AppWizard adds a sample ribbon to your add-in, which will look like this:
The XML in the file [AddinName].RibbonX looks like this:
 CopyXML
<?xml version="1.0" encoding="UTF-8"?>
<customUI xmlns="http://schemas.microsoft.com/office/2006/01/customui">
  <ribbon>
    <tabs>
      <!-- This tab element adds its child groups to the "Add-Ins" tab.     -->
      <!-- To create a new tab element specify the id and label attributes, -->
      <!-- and remove the idMso attribute.                                  -->
      <tab idMso="TabAddIns">
        <!-- This group element creates a new region on the tab specified   -->
        <!-- by its parent element.                                         -->
        <group id="MyAddin_Group" label="My Group"
                             getVisible="GetVisible">
          <!-- This large button displays an image from the resources,      -->
          <!-- whose ID is "LOGO", and a  fixed label. When the button is   -->
          <!-- pressed, the application class event handler function        -->
          <!-- OnRibbonEvent() is called.                                   -->
          <button id="MyAddin_PushButton"
                  size="large"
                  image="LOGO"
                  label="My Button"
                  onAction="OnActionButton" />
        </group>
      </tab>
    </tabs>
  </ribbon>
</customUI>
The virtual function OnRibbonEvent() handles events generated by the ribbon:
CopyC++CXlOper CMyAddinApp::OnRibbonEvent(const CRibbonEvtParams& e) { CXlOper xloResult = CXllApp::OnRibbonEvent(e); switch (e.GetCallback()) { case RIBBONCALLBACK_GETVISIBLE: if (e.GetId() == _T("MyAddin_Group")) xloResult = true; break; case RIBBONCALLBACK_ONACTION: if (e.GetId() == _T("MyAddin_PushButton")) { XlMessageBox(_T("Hello from the ribbon!"), XlMessageBoxTypeInformation); } break; } return xloResult; }
The event handler code first calls the method of the base class (CXllApp::OnRibbonEvent)
to ensure that the return value is of the right type and is a legal value.
Next the callback type is inspected using the CRibbonEvtParams::GetCallback() method. You can find a full list of callback types here: RibbonCallbackTypes.
Note how the unique ID of the pushbutton - "MyAddin_PushButton" - links the
XML in the ribbon to the C++ event handler.
The ID is extracted from the event parameters using the function
CRibbonEvtParams::GetId().
This tells the handler which control generated the event, and the appropriate action is taken.
The handler for the RIBBONCALLBACK_GETVISIBLE event is important.
This event is raised by the ribbon manager and passed to the add-in to determine
whether the top-level control should be visible. In this case the top-level control is the
group MyAddin_Group.
As we can see, the add-in simply returns true.
However, if the add-in is later removed from the active add-ins list, then the ribbon manager
will try, once again, to ask the add-in whether the top-level group should be displayed.
Since the add-in has been unloaded, the manager cannot pass the event to the add-in,
and instead returns false (the default value).
As a result, when the add-in is unloaded, its ribbon controls are automatically hidden.
Editing the XML
If you have the XML schema for the Ribbon UI installed, then you will get Intellisense and contextual help
when you edit the .RibbonX file.
The file is named CustomUI.xsd and should be installed in the folder
[ProgramFiles]\Visual Studio XX\Xml\Schemas.
If it is not installed then you can look in one of two places:
-
You may find the file in the
1033sub-directory of theSchemasdirectory. If it is there, you should copy it up theSchemasdirectory. -
The file can be downloaded from Microsoft's web-site using this link: 2007 Office System: XML Schema Reference. Extract the contents and then copy
CustomUI.xsdto theSchemasdirectory.
For more information on coding the XML for ribbons, please consult Microsoft's web-sites. This guide will only discuss the special considerations for coding a ribbon within an XLL+ add-in.
Adding images to the Excel Ribbon
Image files should be in PNG format, and should usually have a transparent background.
Once you have created an image file, add it to the project and then follow the steps below to embed it as a resource.
-
Open the project's resource file, e.g.
MyAddin.rc. -
In Resource View, right-click MyAddin.rc and click Add resource....
-
Click on the Import... button.
-
In the file dialog, ensure that the Files of Type dropdown contains All Files (*.*) and select the PNG file.
-
Under Visual Studio 2005, the Custom Resource dialog appears: enter
RCDATAas the resource type. Note that there no quotes aroundRCDATA. Press OK to add the image to the resource file. -
In Resource View select the new resource. Under Visual Studio 2005 the resource will will be under the
RCDATAnode, and will have a name likeIDR_RCDATA1. Under later versions of Visual Studio, the resource will will be under thePNGnode and will have a name likeIDB_PNG1. Press Alt+Enter to view the resource properties. -
In the Properties Grid, change the ID to the ID of the image, including quotes, e.g.:
"LOGO". Note that the quotes are always required. The actual ID you use should correspond to the image ID you have used for theimageattribute in the ribbon file.
Building the project
Once you have made your changes to the ribbon file you can build the project. After the project is built, and extra build event will be run, something like the following:
"$(Xlp100InstallDir7)bin\XlpRibbonReg.exe" -a "$(TargetPath)" -q trueThis command runs a utility which registers the XLL with the XLL+ Ribbon Manager, for the development machine.
A line will be added to the Ribbon Manager configuration file (XlpRibbonServer.config),
leaving it looking something like the following:
CopyXML<?xml version="1.0" encoding="utf-8"?> <XlpRibbonServer> <addins> <addin location="E:\OtherProjects\SomeOtherAddin\Release\SomeOtherAddin.xll" /> <addin location="C:\MyProjects\MyAddin\x64\Debug\MyAddin.xll" /> </addins> </XlpRibbonServer>
If you later build a different build of the XLL, for example switching from the debug build to the release build, then the XlpRibbonReg utility will run again, and will change the relevant line, e.g.:
CopyXML<?xml version="1.0" encoding="utf-8"?> <XlpRibbonServer> <addins> <addin location="E:\OtherProjects\SomeOtherAddin\Release\SomeOtherAddin.xll" /> <addin location="C:\MyProjects\MyAddin\x64\Release\MyAddin.xll" /> </addins> </XlpRibbonServer>
Once the Ribbon Manager knows about the XLL, it will look at the resources in the XLL when Excel is opened, and try to find
a resource with the name "RIBBONX".
This will be the XML that was produced by the AppWizard, and which you have edited for your application.
Please note that there is a known problem with the way Visual Studio treats files embedded in resources. If you change the contents of the ribbon file (or of any of the embedded image files), Visual Studio will not automatically rebuild the resource file. You can force the resource to be rebuilt in one of the following ways:
-
In the output directory, delete the compiled resource file, e.g.
MyAddin.res; or -
Use the Build/Rebuild Solution menu to rebuild the entire project.
Trouble-shooting
A number of different problems may arise during development of your ribbon UI:
-
You may have entered erroneous XML in the ribbon file.
-
You may have misspelt the name of a callback function.
-
An image file may be missing.
-
The IDs used in the XML and in the C++ may not match.
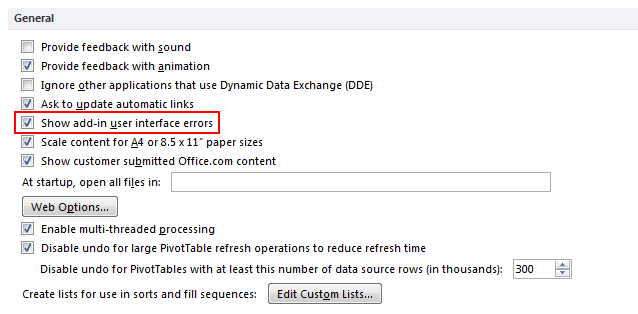
You can get useful feedback on any UI errors by turning on the option to "Show add-in user interface errors", which can be found on the Advanced tab of the Excel Options page, in the General section: