If you have developed an Excel add-in using the XLL+ toolkit, follow the steps below to create a wrapper library for the add-in.
You will also learn how to improve the signatures of the wrapper functions, and how to write a client application that uses the wrapper objects and functions.
This topic contains the following sections.
 Setting up a wrapper project
Creating a wrapper project
-
Open an XLL+ add-in project. For the purposes of this walk-through, we will use the Tutorial1 sample project.
Start Visual Studio with administrative rights and open the solution Tutorial1.sln, which can be found in the samples\Tutorial1 sub-directory of your XLL+ installation. -
In the Project Explorer, right-click on the Solution node, and select Add/New Project....
Add New Project to Solution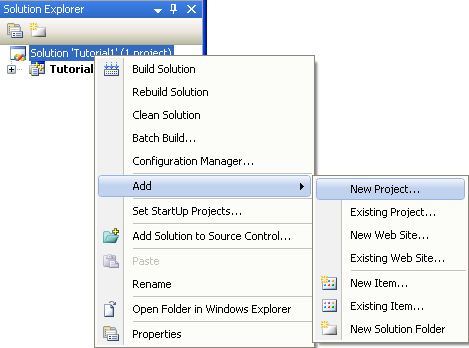
-
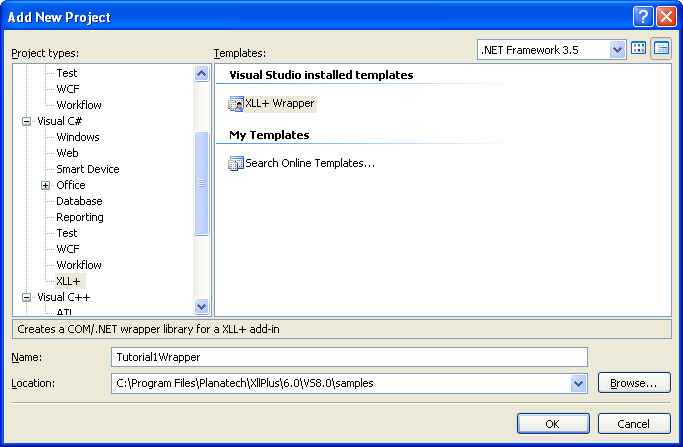
In the Add New Project dialog, select the Visual C#/XLL+ node in the Project Types tree, and select XLL+ Wrapper in the Templates list. (In Visual Studio 2017 and above, the project type is shown in the Visual C# node.)
Name the project Tutorial1Wrapper and click OK.
-
In the XLL+ Wrapper Wizard, click OK.

-
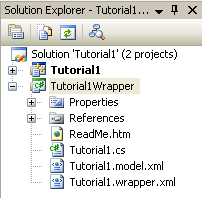
You will see that a new project, containing one C# file and two XML files, has been created and added to the solution.
Updating the model file
-
Open the file Tutorial1.cpp in the Tutorial1 project.
-
Activate the XLL Add-ins window. If it is not currently visible, use the menu command View/Other Windows/XLL Add-ins Window to display it.
-
Click the Set Help topic identifiers command in the Tools menu of the XLL Add-ins window.
-
Click the Export to XML... command in the Tools menu of the XLL Add-ins window.
-
In the Export to XML window, click on the browse (...) button in the Save As panel.

Navigate to the Tutorial1Wrapper project directory and save the file as Tutorial1.model.xml, clicking Yes when you are asked whether you want to replace the existing file.
-
In the Export to XML window, press OK to generate the model file.
After the file is saved, you will be asked whether you want to open the file. Unless you are interested in inspecting the XML file at this point, click No.
-
You should repeat this process whenever you add a new add-in function to the Excel add-in, or change the signature of an existing function.
The wrapper project is now complete. You can now build and test the wrapper library. Make sure that the build is set to either "Win32" ("x86" on some platforms) or "x64"; avoid "Mixed Platforms". Also, if necessary, use the Build/Configuration Manager... command to open the solution configuration window, and ensure that both projects have a tick in the "Build" column.
You may get a build error if the .NET dependencies of your new C# project and of the XLL+ run-time libraries are not the same. For example:
warning MSB3274: The primary reference "XllPlus.ComWrappers.Runtime, Version=7.0.9.1411, Culture=neutral, PublicKeyToken=136fcf4c4730481e, processorArchitecture=MSIL" could not be resolved because it was built against the ".NETFramework,Version=v4.6.1" framework. This is a higher version than the currently targeted framework ".NETFramework,Version=v4.5".You can fix this by opening the Project Properties page for Tutorial1Wrapper, selecting the "Application" node and changing the Target Framework.
Customizing the information file
Specifying the return type of a function
-
Open the file Tutorial1.cs in the Tutorial1Wrapper project. This contains the generated wrapper classes and their methods.
 Caution:
You should never edit this file, because it will be overwritten every time the add-in project is changed.
Within class Tutorial1, locate the wrapper method NORMSINV2. At present it looks as follows:
 CopyC#
public object NORMSINV2(double Probability)
{
    CheckEngine();
    return Engine.CallExcelWithErrorCheck("NORMSINV2", true, errorPrefixes, Probability);
}
The add-in function returns either a number, or an error message. The preferred behavior outside Excel is to always return a type double, and throw an exception if an error message is returned. We can edit the information file to get this behavior.
-
Open the file Tutorial1.wrapper.xml in the Tutorial1Wrapper project. You will see that within the outer element <XllWrapper> there are three sections:
- A <Clients> element contains specifications of the C# wrapper classes that will be generated.
- An <ErrorPrefixes> element contains a list of return values that will be treated as errors.
- The <Functions> element contains a list of named functions, whose signature and behavior can be controlled.
-
At the end of the <Functions> element add a new <Function> element for NORMSINV2, as follows:
CopyXML<Functions> <Function ExportedName="Tutorial1_VersionInfo" Wrap="Never" ReturnType="string[,]"/> <Function ExportedName="NORMSINV2" ReturnType="double"/> </Functions>
-
Press Shift+Ctrl+B to rebuild the project. The code in Tutorial1.cs will be regenerated. If we inspect the wrapper method NORMSINV2 again, we will see that it now looks as follows:
CopyC#public double NORMSINV2(double Probability) { CheckEngine(); object res__ = Engine.CallExcelWithErrorCheck("NORMSINV2", true, errorPrefixes, Probability); return (double)Unwrap(res__, typeof(double)); }
With this change, the wrapper function is now much more useful, since it is strongly typed and handles errors as expected. If the function fails for any reason, an exception of type XllWrapperException will be thrown.
Omitting functions
-
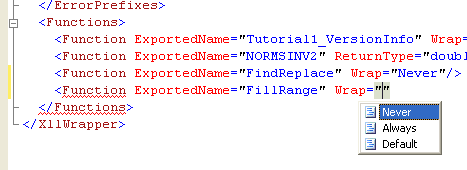
Open Tutorial1.wrapper.xml, and add three more elements just before the end of the <Functions> element as shown below.
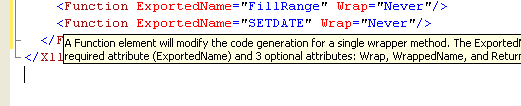
CopyXML<Functions> <Function ExportedName="Tutorial1_VersionInfo" Wrap="Never" ReturnType="string[,]"/> <Function ExportedName="NORMSINV2" ReturnType="double"/> <Function ExportedName="FindReplace" Wrap="Never"/> <Function ExportedName="FillRange" Wrap="Never"/> <Function ExportedName="SETDATE" Wrap="Never"/> </Functions>
 Tip:
Tip:Notice that while you edit the file, Visual Studio uses IntelliSense to prompt you with lists of expected syntax as you type:
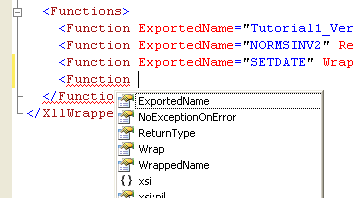
Also, if you hover over an element, help will pop up:
-
Build the project. The three methods FindReplace, FillRange and SETDATE no longer appear in Tutorial1.cs.
Date/Time arguments
-
Open file Tutorial1.wrapper.xml. Add a new <Function> element for GroupedFn, as shown below:
CopyXML<Function ExportedName="GroupedFn"> <Argument Name="StartDate" IsDate="1"/> <Argument Name="EndDate" IsDate="1"/> <Argument Name="PaymentDate" IsDate="1"/> </Function>
These <Argument> elements indicate that the named arguments - represented in Excel as integers, or vectors of integers - are actually dates.
-
Build the project, and inspect GroupedFn, which will now have a more useful signature:
CopyC#public object GroupedFn(DateTime StartDate, DateTime EndDate, string AccountType, int PaymentDays, DateTime[] PaymentDate, double[] PaymentAmount) { CheckEngine(); double StartDate_xldate = DateToExcel(StartDate); double EndDate_xldate = DateToExcel(EndDate); double[] PaymentDate_xldate = DatesToExcel1d(PaymentDate); object[] PaymentDetails = new object[] { StartDate_xldate, EndDate_xldate, AccountType, PaymentDays }; object[,] PaymentSchedule = CombineVectorGroup("PaymentDate", PaymentDate_xldate, "PaymentAmount", PaymentAmount); return Engine.CallExcelWithErrorCheck("GroupedFn", true, errorPrefixes, PaymentDetails, PaymentSchedule); }
Client application
We will build a simple C# test application which uses the wrapper classes. The application needs two references: one to the wrapper library and another to the run-time support library, XllPlus.ComWrappers.Runtime.dll.
Create the client application
-
In the Project Explorer, right-click on the Solution node, and select Add/New Project....
-
In the Add New Project dialog, select the Visual C# node in the Project Types tree, and select Console Application in the Templates list.
Name the project Tutorial1TestApp and click OK.
-
You will see that a new project, containing one C# file (Program.cs), has been created and added to the solution.
-
In the Project Explorer, right-click on the Tutorial1TestApp/References node, and select Add Reference....
In the Add Reference dialog, go to the Projects tab, select Tutorial1Wrapper, and click OK.
-
In the Project Explorer, right-click on the Tutorial1TestApp/References node, and select Add Reference....
In the Add Reference dialog, go to the Browse tab, navigate to the XLL+ installation directory and then to the bin sub-directory, e.g.: C:\Program Files\Planatech\XllPlus\6.0\VS8.0\bin. Select XllPlus.ComWrappers.Runtime.dll, and click OK.
Using the wrapper classes
-
Open Program.cs in the Tutorial1TestApp project and replace all the code with the code below:
CopyC#using System; using System.Collections.Generic; using XllPlus.ComWrappers.Runtime; using Tutorial1Wrapper; namespace Tutorial1TestApp { class Program { static void Main(string[] args) { try { // Create a wrapper engine using (ExcelWrapperEngine engine = new ExcelWrapperEngine()) { // Create a hidden instance of Excel, controlled by this wrapper engine engine.Create(); // Load the XLL engine.LoadXll(@"C:\Program Files\Planatech\XllPlus\7.0\VS8.0\samples\Tutorial1\Debug\Tutorial1.xll"); // Create a wrapper object using (Tutorial1 wrapper = new Tutorial1()) { // Attach the wrapper to the engine before use wrapper.Engine = engine; double d = wrapper.NORMSINV2(0.5); Console.Out.WriteLine(String.Format("NORMSINV2(0.5)={0}", d)); try { d = wrapper.NORMSINV2(2.0); } catch (XllWrapperException ex) { Console.Out.WriteLine(ex.Message); } } } } catch (Exception ex) { Console.Out.WriteLine(ex.ToString()); } Console.Out.WriteLine("Press Enter to exit..."); Console.In.ReadLine(); } } }
-
Change the argument of engine.LoadXll to the actual path to the XLL file Tutorial1.xll on your installation.
-
In Project Explorer, right-click the project node for Tutorial1TestApp, and click Set as Startup Project. Press F5 to build and run the application.
The following points are important in the code above:
- Before any wrapper classes can be used, an instance of ExcelWrapperEngine is created.
- The ExcelWrapperEngine object is heavy-weight - it owns a hidden instance of Excel. Therefore it is important to create only as many instances as are needed (preferably only one) and also to destroy each instance as soon as it is no longer needed. The using syntax achieves this, because ExcelWrapperEngine implements IDisposable.
- The engine must be initialized using Create or Attach before it can be used.
- LoadXll is used to load the XLL into Excel. Unless the XLL has been loaded, all the wrapper object methods will fail. Note that it is the responsibility of the caller to specify the full path to the XLL file.
- Before the wrapper object can be used, it's Engine property must be set. Wrapper objects use the engine to do all the heavy work, and cannot be used without a valid and initialized engine.
- The second call to NORMSINV throws an exception when it fails. This is the correct and expected behavior.
- The engine is automatically destroyed when it goes out of scope at the end of the using block. If you debug the application, and put breakpoints inside and outside the using block, you will be able to use the Processes tab of Windows Task Manager to observe when the instance of Excel is started and terminated.
For more examples of client applications, including C++ and VBA, see the ApiTest sample.